What’s the best Sprinter Van tire pressure?
⚠️ Before you continue, this post is our opinion and not an official recommendation. We’re just sharing what has worked for us as data points for you. Proceed with caution and understanding that you’re ultimately responsible for your own setup, including tire pressure.
In this post we’re focusing on the 2500 and not the 3500 dually. The pressures for the 3500 are likely very similar for highway use. But we’ll discuss alternate pressures for alternate conditions that a dually might not be suitable for.
So, what is the best tire pressure for a Sprinter Van? And does it differ for a 4x4 over a 2WD Sprinter Van? These are great questions and many out there have varying opinions. Ultimately, this is a good starting point but you should experiment with your own rig.

Quick caveat:
All Mercedes Sprinters from 2008 to the present ‘require’ you run an LT Metric (10ply or Load Range E) tire. This allows you to run higher PSI that’s required for heavier loads and towing. For our post, we’ll be assuming we’re only dealing with a 10ply tire (tyre for you Brits). Yes, running a Load Range D or 8 ply tire on a shorty 118” T1N is possible if you’re not hauling much but we’ll dive into that specific use case in another post.
Lets start with the factory specifications / recommendations for a 2500 NVC3 or VS30 (which are the same BTW)

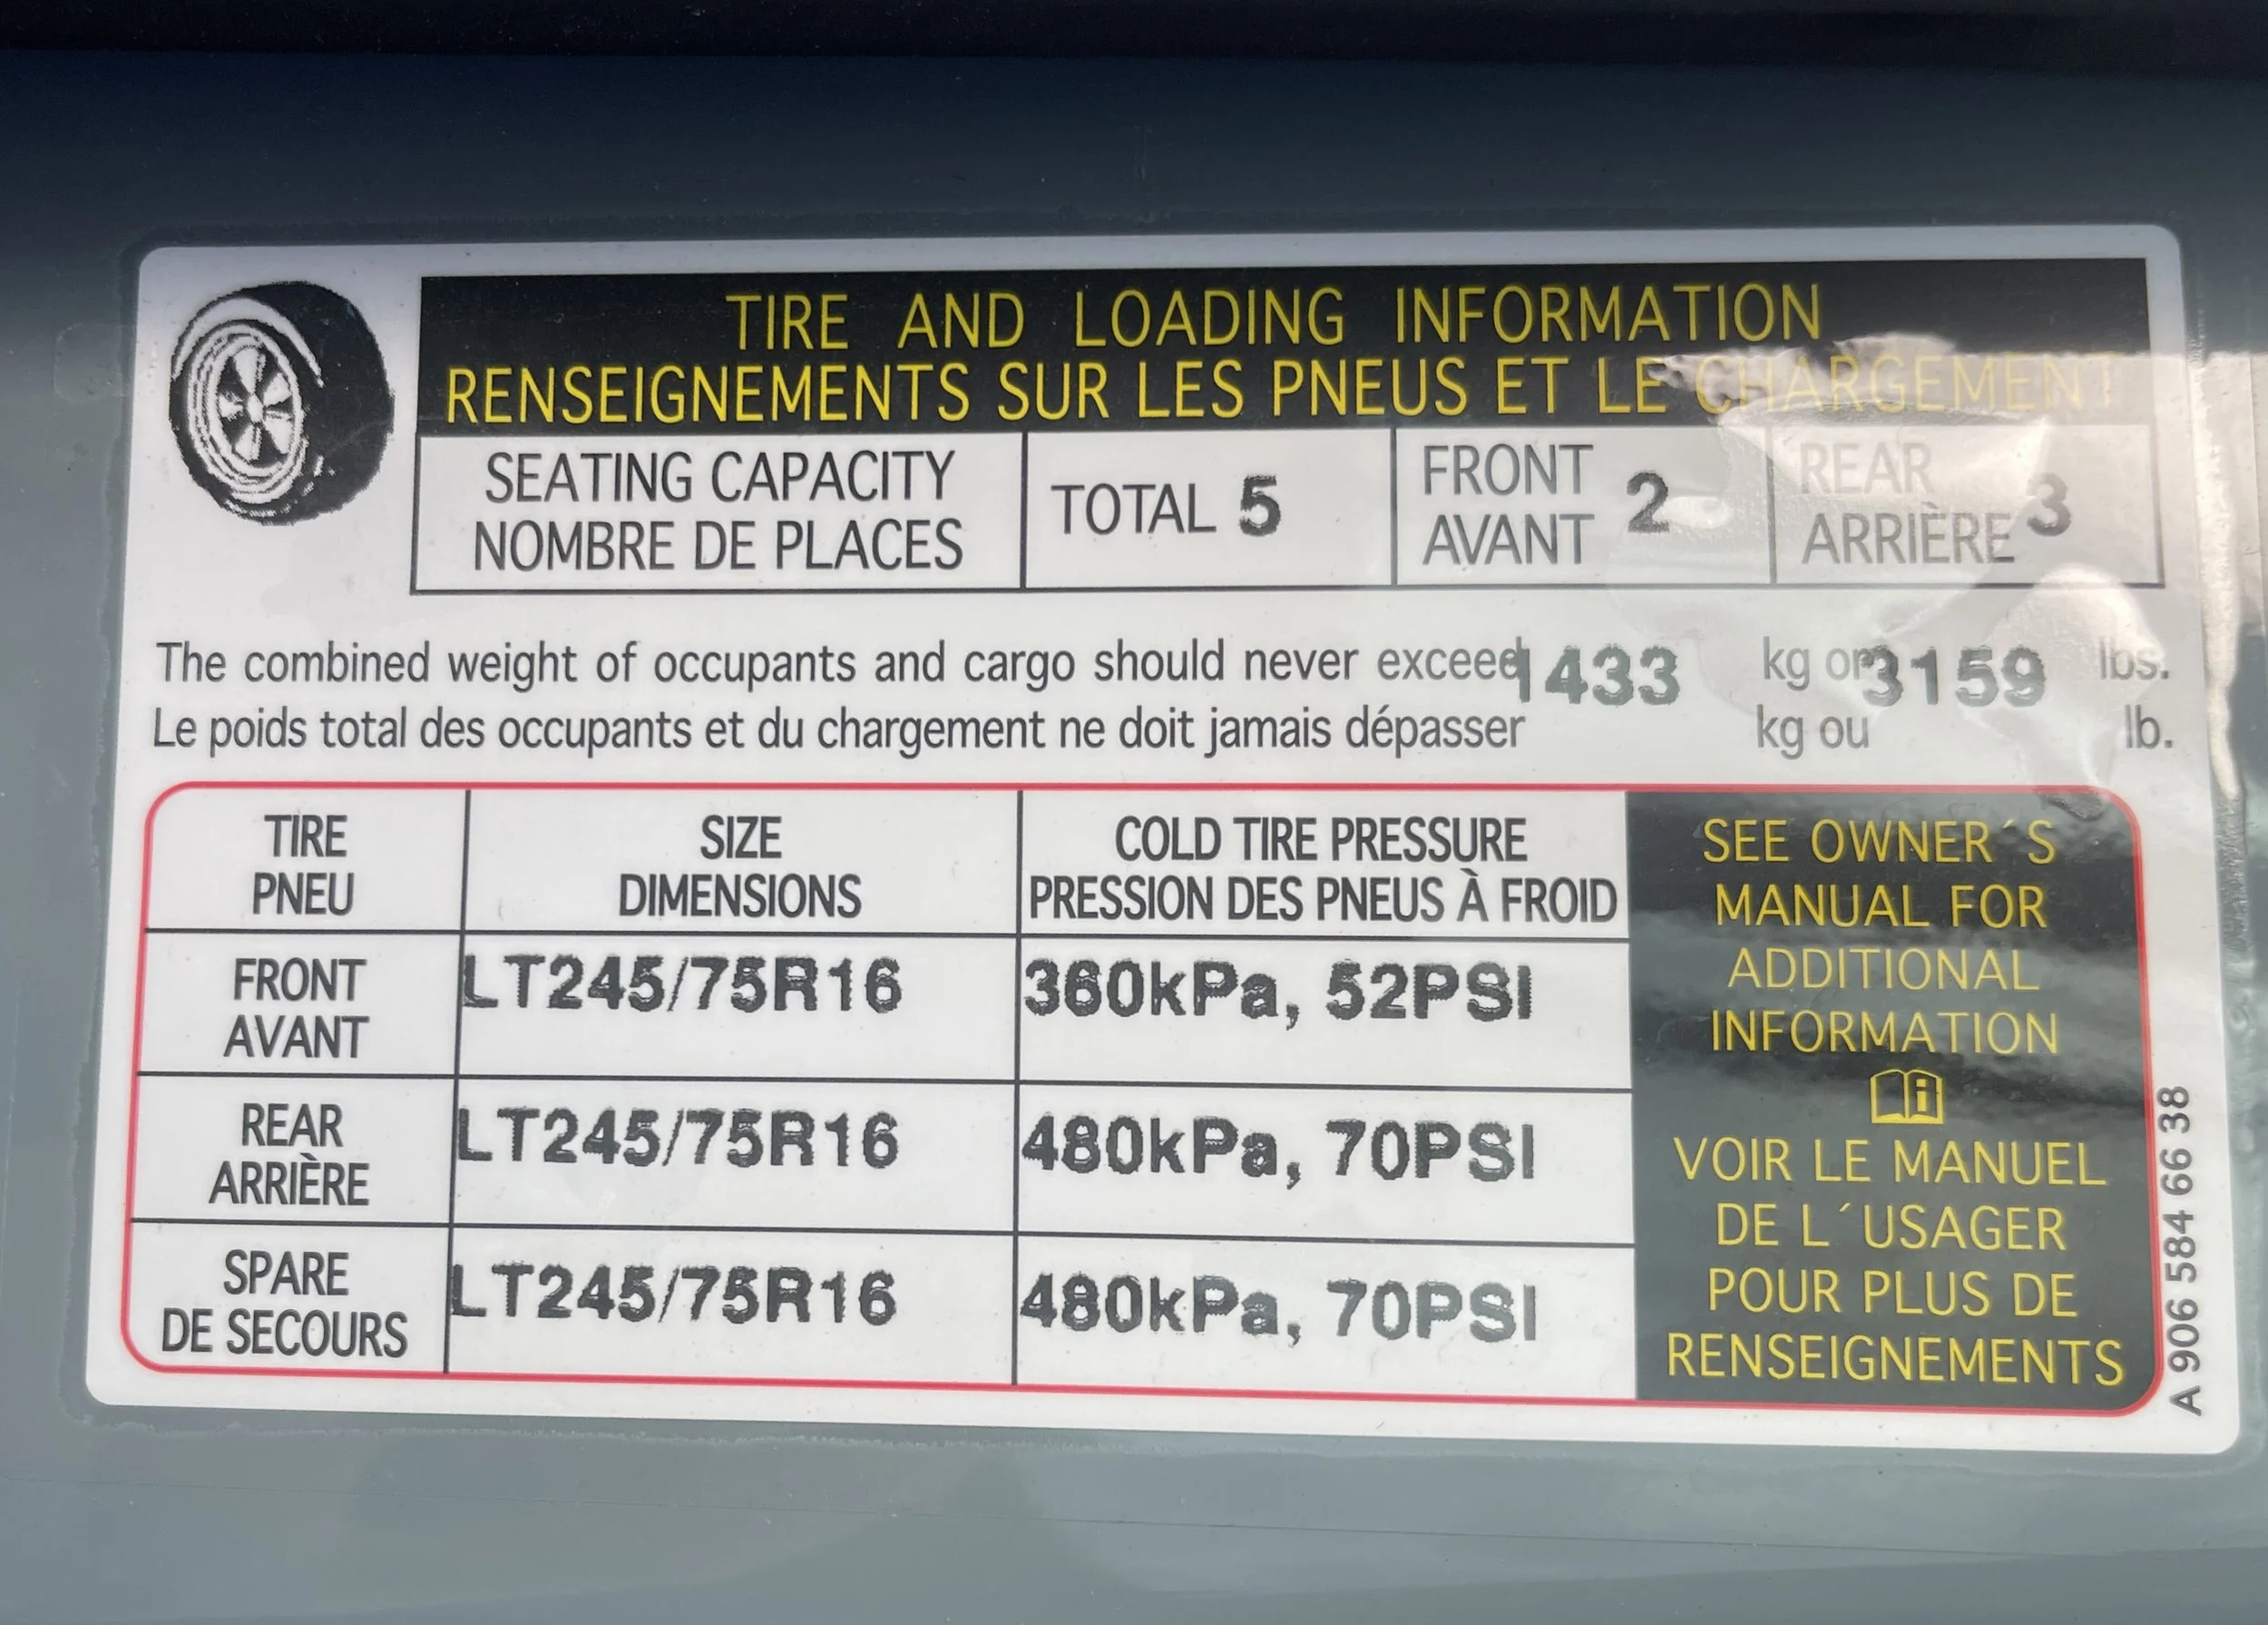
OEM sticker for a 2013 NVC3

Sportsmobile GVWR includes Tire pressure
For the stock LT245/75R16/E 120/116Q46 tires it’s recommended that your run:
Rear: 70 psi
Front: 47 psI (2WD) - 52psi (4x4)
You’ll immediately notice that the rear PSI is much higher than the front. If you look at the stock GVWR (GROSS VEHICLE WEIGH RATING) you’ll see that the front is 1802kg (3970lbs) and rear 2433kg (5360lbs). Or a total of 3878kg (8550lbs).
Since the rear is intended to cary more load and rated as such in the GCWR you’ll want to run higher tire pressure in the rear… when loaded.
Side note: on Sprinter vans you will also see GCWR. This stands for Gross Combined Vehicle Weight Rating. This is the maximum total combined weight of both the vehicle and a trailer, ensuring a safe operating weight when fully loaded.
What your van actually weights unloaded is called Curb Weight (kerb weight). This is the weight of your vehicle that is generally given by the manufacturer and it refers to how much your vehicle weighs when it’s resting on the curb (duh). Since every owner and their use is different, it does not include passengers, cargo, fuel, vehicle accessories (toolboxes, etc), tongue weight or any other separately loaded items.
Here’s a cool calculator for finding Curb Weight .
Here’s two Sprinter van’s and how they compare. Similar but slightly different in GVWR capacity.

2013 NVC3 2500 Low-Roof 144 2WD

2020 VS30 2500 High-Roof 144 4x4
Standard with high roof 144 4x4
Kerb weight at GVW 5,194lbs (2,356kg)
Payload at GVW 3825lbs (1735kg)
Perm. gross combination weight 13448lbs (6,100kg)
Maximum roof load 330lbs (150kg)
Towing capacity braked/unbraked 4,409lbs/16,53lbs (2,000kg/750kg)
Standard with standard roof 144 2WD
Kerb weight at GVW 4629-5194lbs (2,100-2,356kg)
Payload at GVW 2522-3086lbs (1,144-1,400kg)
Perm. gross combination weight 12,125lbs (5,500kg)
Maximum roof load 330lbs (150kg)
Towing capacity braked/unbraked 4,409lbs/16,53lbs (2,000kg/750kg)
VS30 2500 144 4x4
OEM recommended PSI from Mercedes Benz in the USA is 52psi front and 70psi rear.
Not all Sprinter Vans are the same.
Road use
Now that you’ve digested all the technical numbers behind tires and pressure recommendations from the factory, lets talk about real world pressures.
To make this a bit more simplified, we’ll distill this down into three van profiles.
1. Empty cargo van
2. Medium Build Van

3. Full Build
Rear: 50ps |——————————| Front: 40psi
1️⃣ Empty cargo van
(2 seats) where you drive solo (200lbs) and occasionally throw in cargo like some bikes (100lbs), a dirt bike (400lb motorcycle) and a couple bags (50lbs). That’s roughly 300-600lbs of weight above the curb weight and very light. With no side windows this is truly a stealth and spartan set up. Some might actually daily drive an empty van and use it for weekends for a kayak or motorcycle.
You might find that running your front tires at 40psi and rear tires at 50psi might help with your ride quality. Having hard and overinflated tires can make your ride overly harsh and bouncy. (warning, if you do cary a heavy load we recommend inflating to the factory settings for safety). With the van empty you will now actually have more weight located to the front of the van with the engine and transmission forward of the center of gravity. We don’t recommend having the tires the same psi front and rear simply because we feel a van should be available to cary some sort of load. Otherwise, why are you driving around an empty van? 🤔
Rear: 70psi |——————————| Front: 50psi
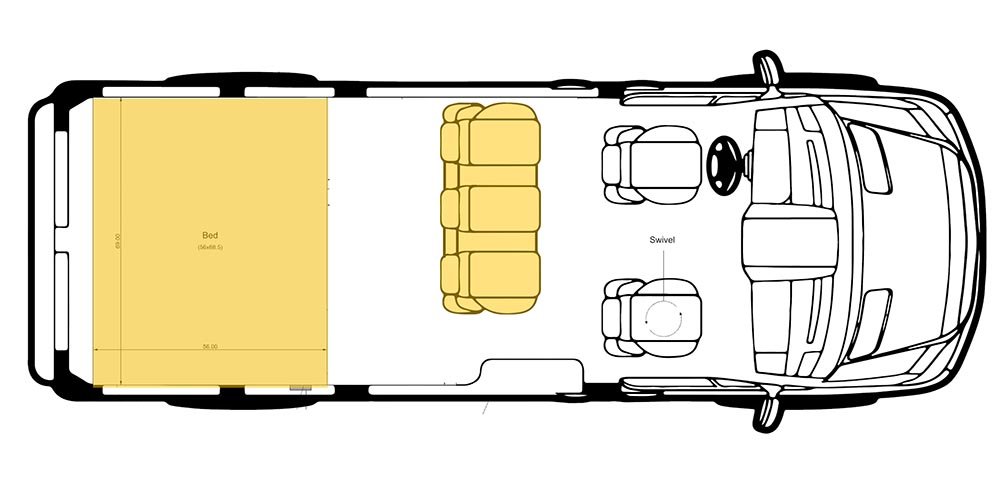
2️⃣ Medium Build Van
Room for 5 (2 seats and a 150lb bench), 3-5 people (600lbs), Bed platform, mattress and bedding (200lb), portable fridge/cooler (100lbs), 1-2 batteries, electronics etc (200lbs) Gear for 3-5 people (200lbs) Roof Rack 150lbs.
That’s about 1500-1750lbs above the curb weight.
This is likely the most popular layout you’ll find. A crew cab with a single bench or even a passenger van with a couple rows of benches removed and replaced with a bed has a similar weight. The passenger van version has added weight with the side rear windows but has a similar profile for tire pressure. Now this layout can vary and you and your gear can vary with this set up. On our rentals we run our tire pressure set up at 50 psi on the front and 70psi on the rear. This keeps the tires set up to deal with the setup, the gear we leave in the van and with an average of 3 people we cary. You can play with 45psi front and 65psi rear to see if a more spartan setup can give you a better ride with lower PSI. At this point you might think about also upgrading the suspension with something like the Agile Leaf Springs and the Vancompass/Falcon Shocks if the van is getting heavier with gear like a larger fuel tank, water, solar panels, skid plates or winch.
Rear: 77psi |——————————| Front: 57psi
3️⃣ Full Build
Room for 4 (2 seats and a 100lb bench), 2-4 people (500lbs), Bed platform, mattress and bedding (300lb), portable fridge/cooler (100lbs), 2-4 batteries, electronics etc (400lbs) Gear for 2-4 people (200lbs), Fresh water tank 20 gal (170lbs). Roof Rack 150lbs, Cabinets 150lbs. Outside storage boxes (100lbs), Solar Panels (75lbs), Bumper and Winch (200lbs) etc…
That’s about 2500-2700lbs above the curb weight. and nearing but under capacity.
This is where you really can feel you van at it’s limit. First off, your tires will be working to they’re capacity. We recommend you run to what your installer/outfitter tells you the PSI should be. We have found that running 57psi front and 77psi rear has given enough support for the added weight. We have found that anything under 65psi on the rear (on road) feels very squishy and can feel like the van is wandering and swaying. That being said, we highly recommend that after a build you upgrade your suspension to handle all the sustained load. Both Agile Offroad and Vancompass do weight tuned options that are made for the weight of your van. Remember all those GVWR numbers we discussed above? Well, getting an accurate front and rear weight will be important for getting the right springs and shocks.
Take-away. Always pay attention to your weight with people and gear and ensure you’re setting your pressure for this use. Pay attention on your next road trip and find a free and open weigh station to get an idea of what your weight is fully loaded. Here’s a few we’ve found on the west coast.
Off-road use
Now that we got the core road use cases out of the way, what about the best tire pressure for other surfaces? We have 4 categories where your tire pressure should change from what you use when on the road.
Earlier we used the three profiles above to identify the general weight of a van and the tire pressure we like. We will use the #2 Medium Build Van as our recommendation. Generally if your van is lighter you can go 5 psi less and if your van is heavier you can go 5 psi higher.
We assume you have a tire that is off-road capable. An All terrain tire like a BFG A/T KO2 or Toyo Open Country A/T III will have tread to deal with these conditions better and have sidewalls that are stronger and able to handle airing down better than an All Season tire like a Kumho Radial 857 commercial van tire which is designed primarily for highway use.
Dirt roads

This is likely the most common use case where you would want to “Air down”. You might hear this term from the jeep and off-road folks out there. You will need to experiment to find the optimal pressures based upon the weight of your van. But airing down is just that. Letting air out and bringing the PSI down (the inverse is airing up).
Not all dirt roads are created equal. You’ll find when you’re in the PNW and a lush logging road will have nice dark dirt but might have some rocks and may find yourself in a slippery situation when it rains. 🌧 But what about those California fire roads that are dusty gravel but riddled with washboard?
As mentioned above, an All Terrain tire is needed. These are tires designed to deal with these varied off-road conditions and will ensure you have maximum traction and durability. But airing down will give you a few benefits over keeping the high PSI pressures 10 ply tires demand.
First, is comfort. Believe it or not, but your tires can and do act as a suspension component.
Harder - The more pressure, the harder/quicker the ride will feel do to fact that the tire has little give and transfers it’s force in much more of a direct manner to the suspension and then the chassis.
Softer - When the pressure is reduced the tire can deform more easily. This comes from forces from the weight of your van from above as well as all the abrupt bumps your tires roll over.
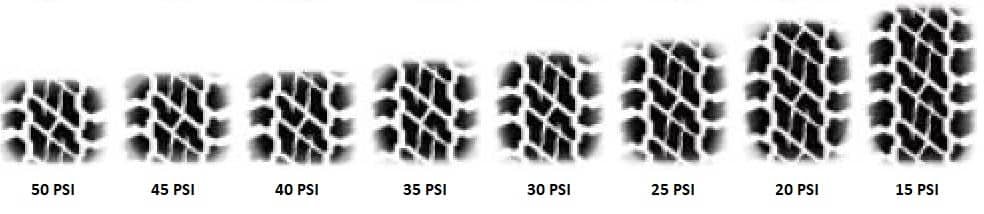
But how soft should I go?

40psi

35psi

30psi

25psi

20psi

15psi
As you can see from the above images as the PSI goes down the tire is able to deform more when going over bumpy objects. These images show just the weight of the truck rolling over a rock. This does not show what it looks like at speed. This is a very different visual. With the weight of a sprinter van sitting around 6500-8500lbs (depending on the build) the weight coming down on the tire needs to be considered. While going down to 15psi on a jeep or FJ is ok due to it's lighter weight. But with a heavier vehicle multiplied by the velocity (speed) that you come across an object the tire will deform quite a bit more. For this reason we do not advise going below 20psi with a loaded Sprinter Van unless you’re stuck!
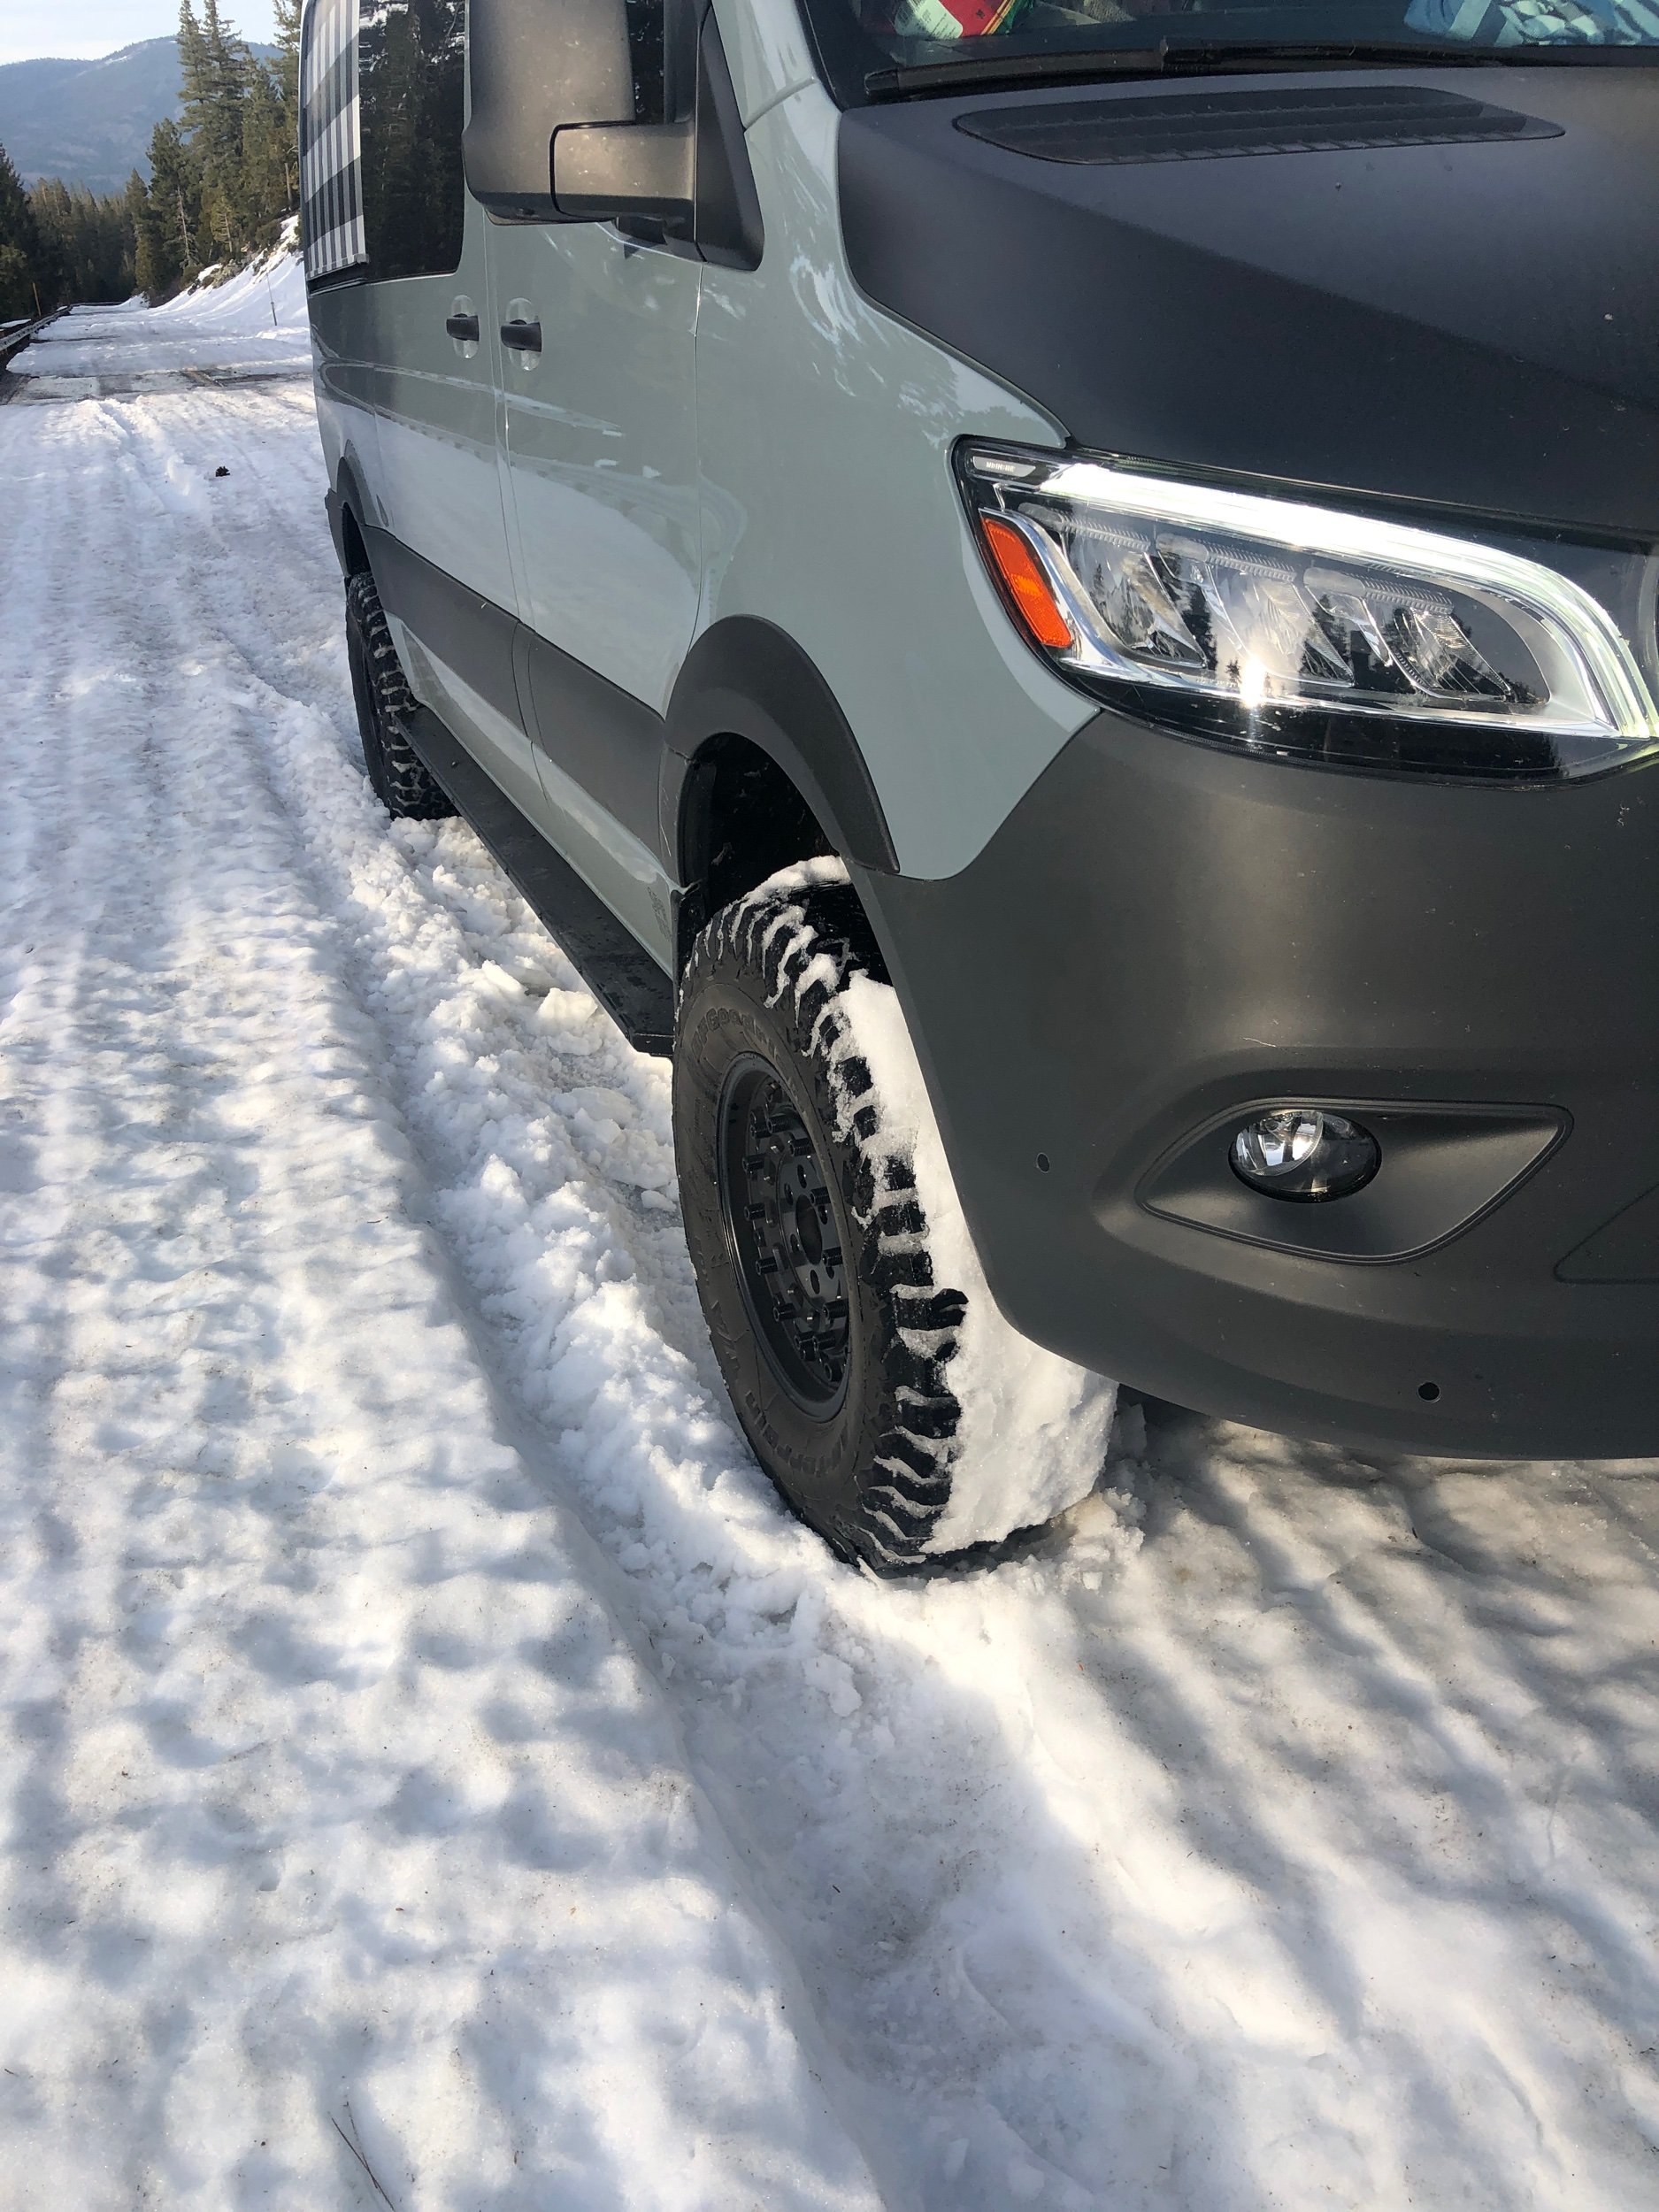
You might have noticed that many off-roaders will have cheap looking steel wheels (as pictured). This is mainly because if their tires have very low tire pressure and hit a large rock and potentially damage the rim, steel is stronger and can bend. If damaged it can potentially be bent back with a hammer. Aluminum alloy rims can bend but most likely will break. And no, they cannot be bent back for a trailside repair. We have both OEM Mercedes Benz Sprinter steel wheels and our more fashionable Black Rhino Alloy wheels. Many of you will likely have upgraded your wheels to a similar alloy wheel so our advice below assumes you’ll be running something like a 265/75R16 on a 16x8 alloy wheel If you have a larger tire you’ll have more to play with. If you’re running the stock size of 245/75R16 you’ll have a little less rubber and should be a little more conservative.
Tacky Fire Roads

These are usually smooth and tacky and don’t require you to really air down. As many of these are forested roads and logging roads, visibility is limited and your speeds will be 30mph or less. Many of the roads from Tahoe up through the PNW have some great trails leading to perfect overnight camp spots where airing down isn’t really even needed. If the road is under a mile or two we don’t bother airing down. But typically if we are out exploring some of these roads, we’ll air down to about 40psi front and 50psi on the rear..
Dusty Hardpack Fireroads

This pretty must sums up the entire Western / South Western USA. You’ll find the roads somewhat travelled by ranchers and adventures. Add the fact that it doesn’t rain much and you’ll begin seeing a lot of washboards develop. This is what you’ll in Baja as well but we have another theory about those roads further down. Since many of these roads can go for 20-80 miles like you see in Utah or California deserts, your speeds might be a bit higher as you can typically see pretty far off in the distance. Our go-to for these is 30-35psi on the front and 45-50psi on the rear because of those expected speeds of 40mph or so. Yes, you can go even lower so you might want to test going + or - 5 psi here but if you’re planning on traveling at 50mph, be aware that your tire will deform quite a bit more over an unsuspecting rock and can pose a risk for getting a flat and/or a damaged wheel. Remember, this is essentially almost half the pressure you typically run and you’ll immediately feel how much more comfortable it will be over some of those rocks poking out and mainly for that awful teeth chattering washboard.
Heavy Washboard

Basically an extension of hardpack fire roads. But when you hit the endless hell that is Mexican washboard roads you air down to keep your sanity and more importantly keep your van from rattling apart. We recommend airing down to 30psi front and 40psi rear and finding that perfect speed where the vibrations are reduced and just get through it. Adventure awaits. Don’t let these bumpy roads put a damper on you exploring all the great roads the southwest has to offer..
Rocky Roads and Climbs

You won’t see as many rocky roads unless they a double track going up or down a hill. Most rocky roads were once trails but now have exposed rocks because of vehicle erosion. This type of terrain really benefits from airing down but taking it slow. A sharp rock can easily puncture your tire or even make it through that 10ply sidewall. The BFG A/T K02 has a kevlar sidewall for this very purpose. While we’ve aired down to 25psi front and 25psi rear for some climbs, we recommend testing out different pressures starting at 35psi front and 35psi rear. You’ll notice that the air pressure is the same front and rear. This is to get maximum traction for your rear tires 2WD vans and keeps it balanced for 4x4 vans.
Sand / The Beach

Driving on the beach is one of the most amazing things you can ever do. When driving out in deep sand there are two things to consider. First, momentum is your friend. Always keep moving in deep and loose sand. And second, airing down will increase your tire’s footprint and will help you keep afloat. This is where you can really test different pressures without risking much damage to your wheels. We recommend running pressure at around 15-20psi on the front and 25-30 on the rear.
Pictured here, the same tires and it’s contact patch at different pressures.
Snow
Obviously chains are THE way to go for maximum traction in the snow but they’re really a PITA to put on and off and limit your speed. But removing air from your tires helps to create a larger contact patch between the rubber and the road surface, which significantly increases traction. Much like driving on sand, dropping tire pressure down to 18psi front and 20psi rear really helps provide a descent amount of flotation.